Showing posts with label Android. Show all posts

Monday, 18 May 2015

MIT App Inventor - Reading and Writing a textfile

Textfiles

Getting information into and out of text files doesn't sound glamorous, but it's one of the most useful basic tools you can learn from any programming language. What I have here is a simple example that allows you to create and add to a text file called 'datastore.txt' and then read out information stored in that. Why might you want to do that? Well lets say you wanted to make a calendar program that notified you of particular events and/or times using notifications on your phone. A simple way of doing this would be to have all the information about alerts stored in a text file on your phone (you could event set up a button to download it from a website!), have your app read that information every day and figure out from it when to make alerts appear on your phone.
To get started you will need a 'File' element from the 'Storage' menu (but in the example above I've also included a textfield, label and a couple of buttons.)


In the code above we do 3 things:

  1. whenButton1.click - adds the text from the textbox to the file (append means 'add to the end of')
  2. whenButton2.click - reads all the information from the file
  3. gets the information read from the file and displays it on screen as the contents of the label field

Challenge:

Make a text file (either by making one and putting it on your android device or writing and app to make one) that contains a time (in seconds) followed by a comma followed by some text, like this:
     10000, "10 seconds have passed"
Then write a program to read this information, use the number to control the TimerInterval of a Timer element and the text to fill in the content of a notification box that appears after the TimerInterval has elapsed. (More info on the Notifier and Timer elements here). Good Luck!

MIT App Inventor - Notifications, Texting and Timer

Notifications

App inventor notifications are a simple way of displaying alerts for particular events on your phone. First off you will need a notifier element (from the user interface menu in designer). Then you will need to decide what is going to trigger the display if the alert. It could be receiving a text, being at a specific location, or (as in the greyed out code block on the right in the above image) it could be triggered by a change in the orientation of the phone. The Notifier element has a number of methods, but two particularly useful ones are ShowAlert and ShowMessageDialog, both of which have examples of use shown above. One is triggered by a timer element (explained in more detail below) and one by an orientation sensor. all the inputs to these methods allow you to control how the notification appears and exactly what it says. Have a crack at getting the OrientationSensor example working (you can find the Orientation sensor element under 'Sensors' in the Designer panel).

Texting

Texting from these apps is remarkably simple (fair warning though, you still incur text charges when you use this app to send a text as you would usually!). The Texting element can be found under 'Social' menu if the Designer panel. The example code in the image above shows how to make a button send a text by using the SendMessage method. Simple right? Well yes, however you need to set the message destination number and content before SendMessage will actually do anything. You can either do this manually in the Designer panel, or you can use other methods on the Texting element to set the message body and recipient number.

Timer

Most of the content above is concerned with setting up and managing the Timer element. Timer is part of the 'Clock' element under the 'Sensors' menu. In the image above the top left and right blocks to two things; allows you to set the time for a notification to occur (using a timepicker element) and then sets a default value for the time picker. So what exactly is going on?
The timer element works like and alarm clock, you give it a certain amount of time (usually in seconds) and, once the timer is Enabled and that period of time has elapsed, the timer element with generate a timer event. You can use this timed event to trigger other events using the 'whenClock1.Timer' element (as I do for displaying a notification above). You set the length of this time interval using 'TimeInterval', and it expects a value in seconds.

WARNING: The timer is super useful but can also get out of control easily. If you set your timer interval too low, then events (like notifications) will trigger multiple times each second and if you have too many your application will crash (as happened to me numerous times). My suggestion whilst you're learning about timer is to have the event you have triggered by it set TimerEnabled to False after it has completed (as I do above) to prevent the Timer triggering too many times!

Challenge: 

Make an app that notifies you 5 seconds after the orientation of your phone has changed.

Thursday, 11 December 2014

MIT App Inventor - Accelerometer App

At 2014 CS4HS myself and several of the physics teachers decided grabbing the accelerometer data from a smartphone could be quite a good way of linking physics with digital technologies, but of course it's more fun to get the students to write it themselves than to get me to do it for them!

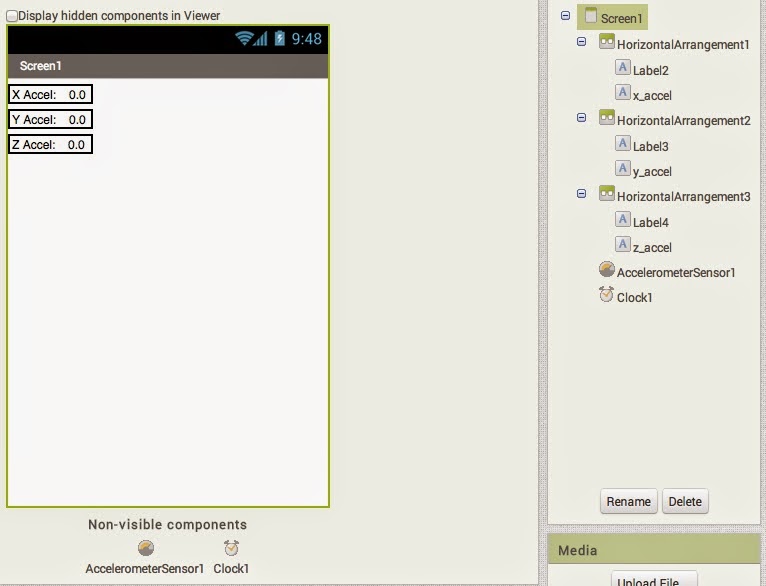
Regardless here's the rough outline for w MWE (minimum working example). You will need 6 label elements (one title and one reading for each direction), the accelerometer element and a clock element. I arranged mine using the horizontal arrangement sections like this:
Then all we need to do is connect the blocks in such a way that  the accelerometer data is printing to the screen with each 'tick' of the clock. Doing it this way prevents the phone trying to query the accelerometer sensor too quickly.

Challenge: Extend your app to store the accelerometer data using the TinyDB element to be printed out to the screen (or possibly to a file for plotting) at a later date

Sunday, 13 July 2014

MIT app inventor - Buttons, Text to Speech, Web and Translate

We just ran this as a workshop at the association of Women in Science conference, so we though we would put it up as an online tutorial too. This will take you through the basics of writing and MIT app inventor App, downloading and installing it to your phone and then following through a few extension challenges beyond those from the standard App inventor tutorials (with a healthy dose of elvish impishness!).

Head over to http://ai2.appinventor.mit.edu/ and login with your google account (or register for one for free) then take a look at the MIT App inventor basics tutorials here: http://goo.gl/sVZMzK.

It's worth noting that you DON'T need an Android phone to test these out as if you have installation privelages to the computers you're working on then you can simply install an emulator. Unfortunately this is only currently an option for OSX and Windows, which also allow direct connecting of an Android phone to a computer with the MIT App inventor editor on by Wifi or USB cable. This awesome little feature instantly clones the app you're creating to your device allowing you to test it in real time. If you're a dedicated linux user like us though, then a nice workaround is to simply use the 'Build' functionality at the top of the page to build your program and then automatically download and install it to your phone using a QR code (however you can end up with a lot of apps installed to your phone this way!).

Our first app: Text to Speech

Aim: An app that speaks some text that the use inputs
        Instructions: Here
Challenge: Extend your app so that it screams when you shake it (check out the .shaking method in the accelerometer sensor)


Our second app: Ball bounce


Aim: An app that allows you to control an on-screen ball
        Instructions: Here
Challenge: Increase the numbers of balls to 5, and allow collisions between balls

Repeater

Aim: An app that recognises voice commands and reads them back to you.

        Instructions: 

Start a new project and set up a basic screen with a button, a label, a speech recognizer and a text-to speech-element. Using the blocks editor, set up these blocks:
Simply, when the button is pushed, the app will try and recognise what has been spoken and will print a copy to the label and then attempt to speak it outloud. Yes, the SpeechRecognizer isn't great at NZ accents. Yes it's a source of much hilarity. Convieniently MIT app inventor have just introduced some new translation functionality in the form of the YandexTranslate design element (found under the 'Media' tab). You can pass this a string of words and it will attempt to translate it into a language of your choice.

Challenge: The 'repeater' app reads back to you in Italian


If you're looking for other languages:

  • en - English
  • es - Spanish
  • de - German
  • no - Norwegian
  • fr - French
  • ru - Russian (however the altered character set will appear in the translation label but not be read out by the text to speech element)

Insulter

Aim: An app that scrapes data from a website and prints it on screen

        Instructions: 

As per usual we're going to start off with a button and a label field, but because we also need data from the internet we will also need the 'Web' element from the Connectivity tab. The set up some blocks:
The first block connects the button with retrieving the html of the website. The second block triggers when that call is complete - and contains and 'if' statement that tests is the website retrieval was successful (responseCode = 200) or not. If it was successful then the returned html is printed to the screen and then spoken by a text to speech element. Initializing the local variable isn't necessary here - but becomes useful in the next step. And yes, you're reading this code right - this will just print the entire html of the website.

So our next step is to 'parse' the website html to allow us to pull out the elements we want. To see the html I'm talking about, head over to http://insult.dream40.org/, right click and select View Page Source. If you look though it you will quickly find two lists of words that the website picks from to get its insults.We can use a 'split' block from the text tab to help us sort through it. I suggest starting by getting your program to grab one insult from the website and display it - then modify that to allow it to grab multiple elements and choose randomly between them. There IS an inbuilt Html Parser method in the Web element, but we were unable to get it working so we just did it by hand!

Challenge: Gets insults from http://insult.dream40.org/ and speaks them.


If you're interested in doing more you can follow our MIT app inventor bluetooth tutorial here: http://goo.gl/QbQhLk

References:

We've borrowed lots of this material from the MIT app inventor team of course! you can find all their wonderful tutorials here: http://appinventor.mit.edu/explore/ai2/tutorials.html and they're by FAR the best way to learn all about App inventor.
We also found this tutorial about getting Yahoo Stock prices really helpful: http://beta.appinventor.mit.edu/learn/tutorials/stockquotes/stockquotes.html
For those that want access to more Android functionality - we suggest Android studio rather than the old Eclipse plugin.

Monday, 26 May 2014

MIT app inventor - Bluetooth communication


In this exercise we create a simple app to send commands via bluetooth from an android smartphone. Ostensibly this will create a wireless control app for robots or wearable electronics, but it’s intended to provide a MINIMUM WORKING EXAMPLE (MWE) for bluetooth communications using MIT App Inventor 2

Background
Before we leap in, a few things to explain. Bluetooth communication is wireless (similar to Wifi but on a different frequency). Bluetooth enabled devices require connection via MAC addresses (i.e. a unique identifier for each device) before information can be transferred. Finally when information is being transferred each device in the pair acts as EITHER a client (requesting information) or a server (providing the information that’s requested). Most devices can switch between modes allowing for bidirectional information transfer - remember it’s just assigning which device is talking and which devices is listening at particular times. Also information via bluetooth doesn’t all come at once, it’s sent in Bytes, so when listening you will need to include an indicator of when messages and/or words are complete.

Getting started
Go to MIT app inventor and register and login: http://ai2.appinventor.mit.edu
Start a new project.

Design
How do you want your App to look? What buttons/functionality does it need?
Here’s a list of what you might need for an MWE:
  • connect buttons that allows device selection
  • data entry - text field or by more buttons
  • disconnect button
  • quit button
  • labels that state whether devices are connected or not
Add as much more complexity as you want (but perhaps get these bits working first)!

The ‘designer’ screen
This screen (where you start), allows you to pick the elements (like buttons) that you want your app to display. We decide what each one does later. So from the left hand bar click and drag 3 buttons into your app (if you want to play with layout check the layout tab) - and call them: btnDisconnect, btnExit, btnSend. Finally also drag over a ListPicker element and call it lipConnect. Change the text of these buttons (under properties on the right hand side of the screen) to ‘Disconnect’, ‘Exit’,’Send’ and ‘Connect’ respectively. Now drag across a label element and rename it ‘lblResult’. Finally include a clock element, and a Bluetooth Client and server elements (found under the Connectivity tab).

The backend
Now the fun begins - we start writing some code for each button!
In the top right of the screen is a button that says ‘blocks’ - select it and you should be taken to a blank canvas. this is where we will create our masterpiece (or piece of rubbish depending on your degree of confidence and patience!).

Exit
We’re going to start with the exit button - why? Because it’s simple.
On the left click the btnExit element and you will see some options pick the one that says:

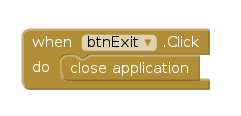
when btnExit.click
do

and click and drag it to your canvas. All of those options were different things interacting with the button allow you to do (like a long or short press etc). Now from the control menu on the left select an element called ‘close application’ and drag and drop it into the matching btn.click element you found before. DONE. Now we have made a button that exits our program. Not too tricky was it? Just remember what we did - we picked from the option of a particular button and then found something that let us choose what to do with it. It will be the same for all the other buttons too!


Connect
Our connect button is more complicated because selecting it asks you to choose from a list. A list of what?! A list of bluetooth devices that your phone can find.

From the lipConnect element select:

when lipConnect.BeforePicking
do

and fill it with (from the green login menu)
set lipConnect.Elements to BluetoothClient1.AddressesAndNames

This populates our list with all the devices our bluetooth module can find in the local area

Now in a separate block of code select

when lipConnect.AfterPicking
do

and fill it with (from control):

if
then

Under if put (from the purple procedure menu)
call BluetoothClient1.connect
        address -> lipConnect.Selection
Under then put
    set lblResult to Connected

Disconnect
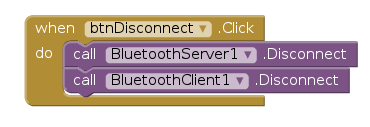
when btnDisconnect.click
do
BluetoothServer1.Disconnect
    BluetoothClient1.Disconnect


Clock
Now we want to check is and when new messages are being sent. From the Clock element select:
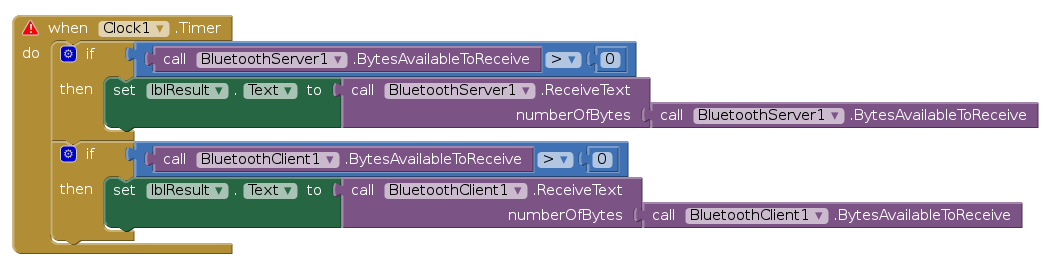
when Clock1.timer
do
    if LIST [call BluetoothServe1.BytesAbleToRecieve > 0]
    then set lblResult to call BluetoothServer1.ReceiveText
                    numberofbytes -> BluetoothServer1.BytesAbleToRecieve
    if LIST [call BluetoothClient1.BytesAbleToRecieve > 0]
    then set lblResult to call BluetoothClient1.ReceiveText
                    numberofbytes -> BluetoothClient1.BytesAbleToRecieve

Send

when btnSend click
do
    call BluetoothServer1.SendText -> ‘1\n’
    call BluetoothClient1.SendText -> ‘0\n’

The \n in the above signals the end of a line to serial communications.

The program above is now functional (just barely - it will break at the slightest provocation). Go try it! A much MUCH better version can be found here: http://ai2.appinventor.mit.edu/#6612352820576256

Complete with error handling and a lot more stuff than what we covered today

Initialize
#this isn’t explicitly necessary

Print
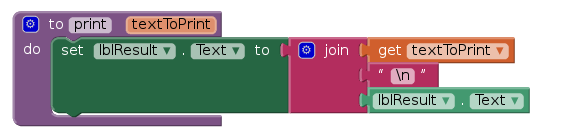
a really really useful way to clean this all up is to use methods or functions - little bits of code you use again and again. Here’s and example of a print function that we could (and should have) used in the example above. From Procedures

__ to print texttoPrint
do
    set lblResult.Text to -> join -> get TexttoPrint
                      -> ‘\n’
                      -> lblResult.Text


Extension:
Error Handling
Remember’s previously connected devices and automatically connects

References:
http://puravidaapps.com/btchat.php