Showing posts with label programming. Show all posts
Showing posts with label programming. Show all posts
Friday, 25 July 2014
Tkinter - Random Backgrounds with Python, version 2!
Our original random background generator was rife with errors so we've restructured it to make it a little better. See if you can follow the math and where I went wrong in the last one!

Tuesday, 15 July 2014
Python - Level 3 Material
Level 3 Python Topics
- Review Python Level 1 Topics
- Review Python Level 2 Topics
- Tkinter (GUIs)
- Object Orientation (classes)
Tkinter
Tkinter is a python module for creating simple graphical user interfaces (windows and elements). Whilst I covered the basics of making a Tkinter canvas and drawing shapes here, I'll also mention how to add buttons and text fields etc. Here's something we might start off with:Now to add a button:
But this button doesn't do anything. To attach some functionality to it (in this case we're going to overwrite the blue rectangle with a white one) we use the 'command='statement in the Button() method and then we write a method linked to that (in our case called doClear).
But we can also add more than buttons - for instance here's a text_field with an associated label:
And here's a dropdown menu that allows users to pick from a series of predetermined choices:
Challenge:
Make a Tkinter GUI that allows the user to pick from a list of countries and then draws out their flags using the Tkinter canvas create_rectangle/arc/oval commands when the 'Draw' button is pushed. I suggest starting with Japan, Germany, Norway and Scotland.
Object Oriented Programming
Object orientation is a way of re-organising your code in such a way that it makes doing lots of complicated things much easier (a bit like we did with methods in the Level 2 section). The only way I managed to wrap my head around it (and it took me ages!) is to think of an illustrative example. Imagine you were writing a simple game like pong for instance.
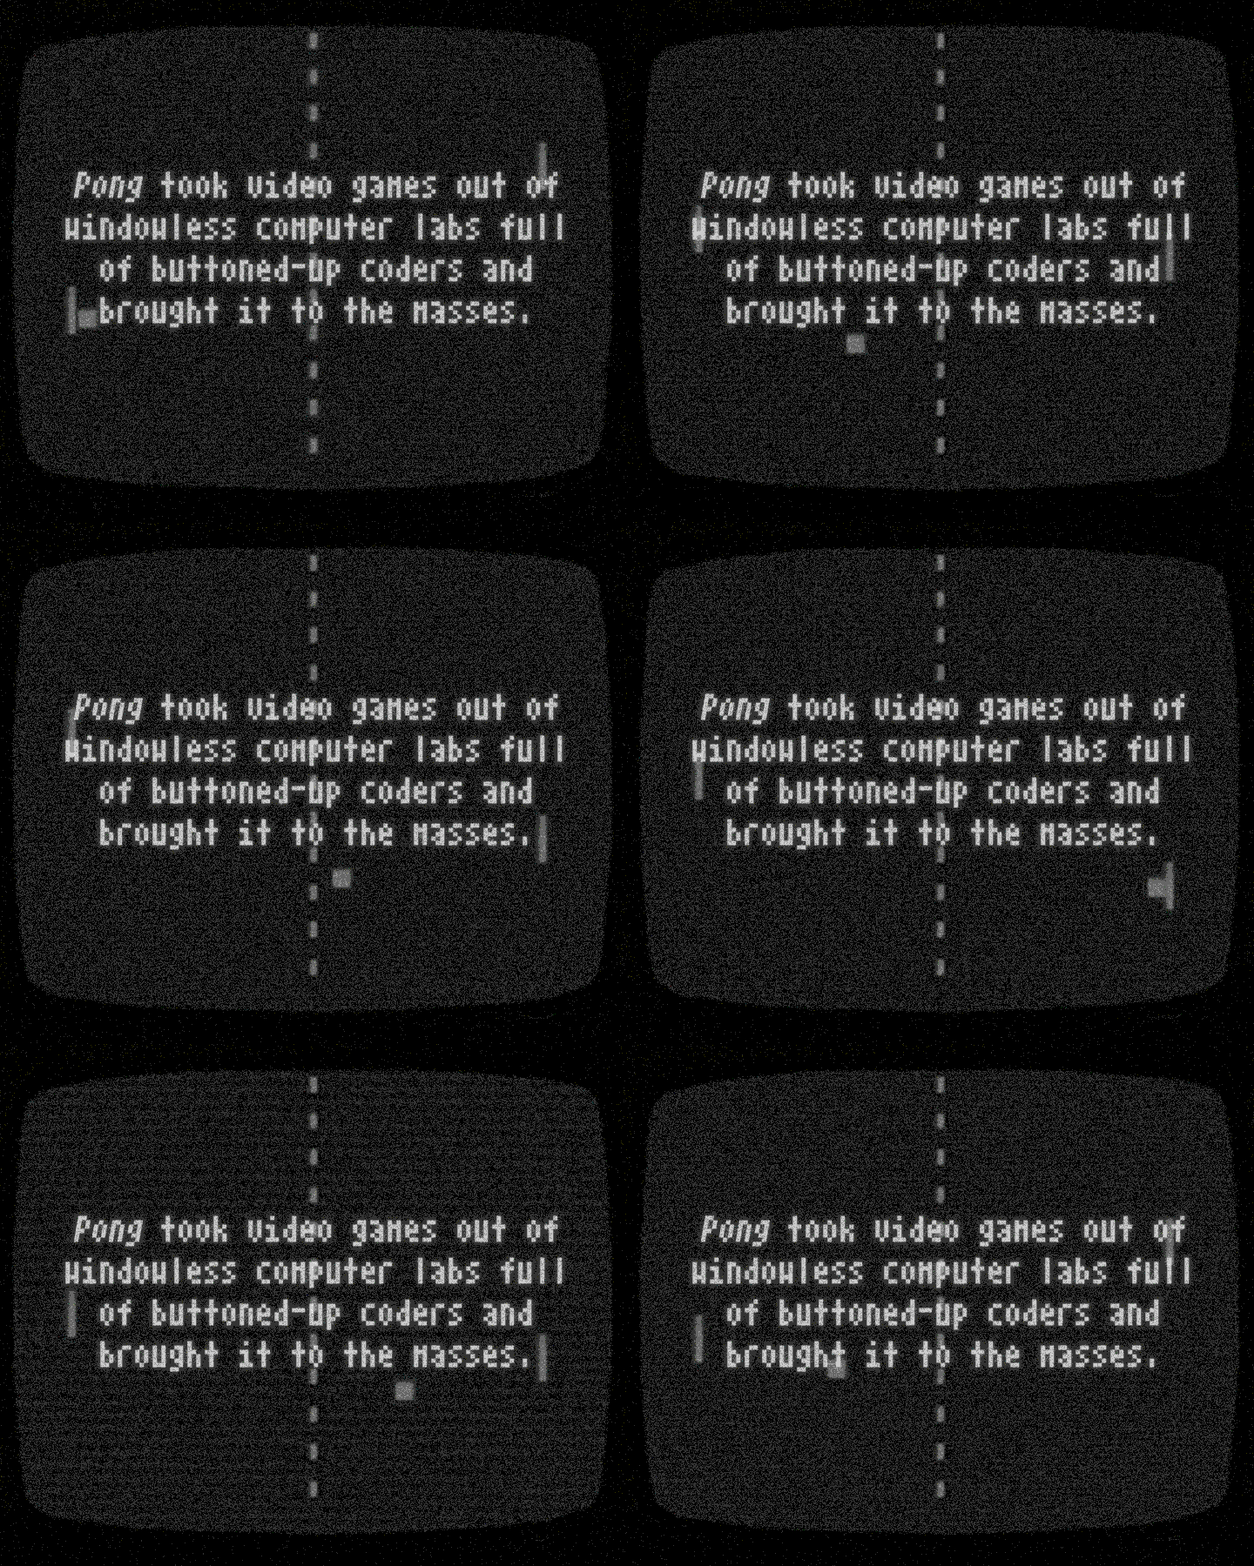
Essentially you need to create two paddles and a ball (ignoring scoring), remember where each is, what direction it's travelling in and at what speed, where its edges are etc. You can do this pretty easily with only 3 items (although it will require a fair few variables). But imagine what would happen if you tried to extend pong in any way; What if you decided to add 2 balls? Or 3? What if you just wanted to add in a third dimension? The number of variables and complexity gets huge! And we're just doing more of the same, so instead we write a Class for the ball and paddles and then we just say how many of each we want. Each class remembers its own set of variables, which means we only have to define each one once and every new copy already has its own variables. For instance the Ball class might be defined like this:
The full code of a ball class might look like this:
and now if we want to add bouncing functionality off the walls (and generally clean up the code)
Challenge:
First, extend the code above to have >100 balls all starting at different locations (this should only take about 5 more lines of code). Make Pong using Tkinter and a class for the GUI, paddles and ball(s).Final Challenge:
Build a 'mosaic maker' program - a program that generates a grid of squares in a GUI canvas and allows the user to change their colour by clicking on them (example shown below). The GUI should have 2 buttons that allow the user to select either red or blue for the colour of the clicked square (the default should be black) and one that allows the user to clear the grid to white. Finally you may want to extend your program to allow the user to replace a square with a .png image of their choice or to choose particular colours by entering their numeric RGB values, and write a doctest that tests your programs ability to deal with non-RGB inputs. Finally re-structure your program so that you have a class for the GUI.

Python - Level 2 material
Level 2 Python Topics
- Review Python Level 1 Topics
- Methods
- Importing Text files
- Navigating Lists
- Sanitising user input
Methods
In the Level 1 material we used a number of 'methods' already (like rantint() and range()). These were predefined by other people - but we can just as easily write our own to do what ever we want, is particular this comes in really handy when you want to do the same or similar things multiple times. Rather than copy pasting our code - we can just repeat a method with different inputs.
Challenge:
Construct a method that picks a random number between 2 numbers passed to the method but that DOESN'T include the numbers themselves.Importing Text files
Importing text files and processing them is how I actually got into python, it's certainly some of the simplest functionality that allows you to do a huge amount!
As with everything we can also wrap it into a neat little method to use again later:
Lets say you're interested in global companies performance - you can get data from Wikipedia about their financial performance and turn it into a csv or txt file using Google spreadsheets (tutorial here), but in this just download this data as a csv.
Navigating Lists
Now we've converted our text file to a list we can now navigate it's rows and columns easily
Challenge:
Using this table from Wikipedia (and a Python program), determine what's the most common starting letter for the name of one of Snow White's 7 dwarves (or just the most common name).
(N.B. you can also use python to automatically get the data from the net for you using a module called urllib2 and the method urlopen(url) but it's far easier to start with a text file.)
Sanitising User input
Here's a few nice tricks for sanitising user input - can you figure out what each line does?Challenge:
Wrap the above code into a method that takes a text question and a list of acceptable responses and returns the user's answer when they give an appropriate one.
Final Challenge
Create a program that counts all the individual letters in a book and how many times each one occurs, then prints the results (I suggest a copy of Charles Dickens' 'A Tale of Two Cities' which you can get free here). Why? You might be able to use the frequency of certain letters as a sort of 'fingerprint' for the language of that book (i.e. is it in Modern English, Old English, German, French or Latin?), but also this 'frequency analysis' is the most basic method of code cracking. Lets say you receive some encoded text that has been encoded with a simple substitution cypher (i.e. one letter has just been replaced with another). A frequency analysis like this will show (roughly) which letters are which in the encoded message allowing you to start to decode it (for example in English the most common letter is 'e' so the most common character in the encrypted message is probably also 'e'). If you want to test your cracking skills find a nice long string and encode it with the command 'encode':
Then do a frequency analysis on the encoded string and see if you can figure out what character has been replaced with what (ideally you would have someone else encode the message so that you didn't know what the original message was!).
Python - Level 1 material
I've been running introductory Python sessions with students and teachers from around Wellington for the last few months looking at the material relevant to NCEA level 1, 2 and 3 digital technologies achievement standards. In the interests of discussion and improvement I'm going to post what I cover here along with the Challenges I pose to participants along the way to get people to use the knowledge I'm allegedly imparting to them over the course of the session. So without further ado here's Elf short, sweet foray into Level 1 Python (I'll cover level 2 and 3 in other posts). Feel free to copy and paste this code into ipython or a python script and run it as you go so you get a feel of what each block does.

Level 1 Python Topics
- User information (input())
- String editing and concatenation
- For Loops (for i in range():)
- Counting (i+=1)
- Random numbers and modules (import)
- Conditional logic (if:)
- While Loops (while True:)
User Information and string editing
Challenge:
Ask the user for their name, address, phone number and the colour of their house. Then print out a description in the form of: "Your name is <name> and you live in a <colour> house at <address> and I can call you on <phone_number>".For Loops
Challenge:
Using a for loop within a for loop print the numbers 0-10 3 times.
Counting/Iterating
Challenge:
Ask the user for a number then count down from that number.
Random and modules
Challenge:
Ask the user for a number and then print that many random numbers between 10 and 100. Hint: you will need to convert your user unput from a string to an integer using the int() command.
Conditional Statements
Challenge:
Pick a random number. If less than 10, or if equal to 30, or if it's not greater than 50 print 'Yes'.
Otherwise print 'No'.
While Loops
Challenge:
Set a while loop that picks and prints a random number that has a 1/100 chance of breaking from the loop.
Final Challenge:
I find the best way to learn these concepts is to have a challenge that uses them all. A nice simple example is creating a computer game of Rock, paper, scissors which you should be able to make using only the coding elements I've described above. You will need to ask the user for their choice of rock, paper or scissors (can you allow the user to ONLY select from these somehow?) - then get the computer to pick as well (those random commands might come in handy) - then compare the two inputs and decide who wins and (as games usually run the best of 3) you will need to count each players score and decide which player has won. And once the game has completed you might want to ask your players if they want to play again?
Finally - if that's all too easy for you I suggest creating an 'expansion' to your game that plays rock, paper, scissors, lizard, spock following this logic:

Tuesday, 3 June 2014
Stellarium - Intro to basic scripting
I am a space nut. I love everything about space, from how weird and mysterious it is, to how vastly, hugely, mind-bogglingly big it is to Douglas Adams. It's difficult to explain at the best of times and something like a static powerpoint simply never does it justice. In my travels I have discovered quite a few programmes for exploring the universe, including the weighty Celestia, but my favourite in terms of ease of use is currently Stellarium. It's free and open source and a great way to get into exploring the sky in some detail. Also it comes with a scripting interface and a host of complex examples - so in this tut I'm going to describe the very basics of setting up and automating a Stellarium script.
Installation and Use
Download and install Stellarium here. Run the program and it will show you the stars from Paris for the current date. Have a play and get used to the controls (a full list is here), but some useful basics:
- A - toggles the presence of the atmosphere
- P - toggles the labels of the planets
- Ctrl + Up/Down - zooms in and out
- Space centres on the selected object
- F12 - displays the command window (for scripting)
Expanding the bottom left corner pane reveals a spanner, select it and navigate across the the scripts tab to find all the loaded demo scripts. Finally, to edit or create new scripts you will find them in the Stellarium directory's 'scripts' folder and you should be able to edit them with any text editor (if you keep them here they will automatically appear in the scripts list).
Time and Place
The most confusing thing (for me!) about planetarium software is getting the time and place correct that you're looking to replicate. In Stellarium there are two commands for setting and getting time and position data:
These commands return the current time and location in Stellarium and set those as the current location. Nothing too magic here, but you can also pass the set commands any date or location and it will display what is visible from those coordinates.
i.e. These are the stars at 5am on the day I was born, as seen from Wellington, New Zealand:
Setting focus
Because of the aforementioned hugeness of space, it's inadvisable to to jetting off without knowing roughly where you want to go. For that reason, the easiest way to script is to select your target object, turn to face it and them move directly towards it. In Stellarium we can do that with the commands:
The second line of the above sets Stellarium to keep tracking the object as it moves through space. Then we can zoom in and out with:
with the core.wait(5) command setting the script to pause between commands, for 5 seconds (it's always a good idea to do this to allow the camera to complete one motion before starting another). We can direct the zoom to a specific scale with:
Challenge!
Generate a script that centres on and then zooms to the planets in order, then speeds up time to show the rotation of each planet, then finally zooms to our nearest star (Proxima Centauri) and looks back to see our sun from there.
As as per usual here's a full functional script that centres on the moon and then zooms to show Jupiter and the Galilean moons as an example.
Thursday, 29 May 2014
Installing Python, pip, Pyglet and OpenGL
I made the slight mistake of assuming that everyone would have Python and the various libraries installed before starting - or at least know how to get them, completely forgetting of course that I had no idea how to do any of this either!
So firstly go to the Python site, download and install python. I would recommend getting Python3 if you have the choice (although the difference won't make much difference for these tutorials). Just be aware if you're planning on using lots of old libraries or Pygame that you will likely want Python2 instead. Run the installer and, if you see the option, choose to update the system Path variable. (If not don't worry we will solve that later).
Next we're going to get python and pip running from the command line. Why? It will make it far easier to install any other external libraries you might want to use in the future - such as matplotlib, numpy, pyglet, ipython or sympy (all of which I'll use a lot in other tutorials!). So open a command line (or terminal if you're on a Unix system), type 'python', hit enter and see what happens! If you're on windows, to launch the command prompt, click the windows icon on the bottom left corner of the screen, then type 'cmd' in the search box and hit enter. If you're on OSX go to launchpad in the doc -> Other/Utilities -> Terminal. If you're on linux i'll assume you can either do it already or can google it :p
If the command prompt has changed from a dollar symbol to these: >>> then congratulations! Skip the next bit and go straight to the Installing Pyglet section below (type exit() and hit enter to get rid of the >>> symbols and go back to the normal $ prompt). If instead you got 'python is not a recognised command' then follow the instructions below. (it just means that whilst you have python installed your computer doesn't know where to run it from - we can fix that!)

So firstly go to the Python site, download and install python. I would recommend getting Python3 if you have the choice (although the difference won't make much difference for these tutorials). Just be aware if you're planning on using lots of old libraries or Pygame that you will likely want Python2 instead. Run the installer and, if you see the option, choose to update the system Path variable. (If not don't worry we will solve that later).
Next we're going to get python and pip running from the command line. Why? It will make it far easier to install any other external libraries you might want to use in the future - such as matplotlib, numpy, pyglet, ipython or sympy (all of which I'll use a lot in other tutorials!). So open a command line (or terminal if you're on a Unix system), type 'python', hit enter and see what happens! If you're on windows, to launch the command prompt, click the windows icon on the bottom left corner of the screen, then type 'cmd' in the search box and hit enter. If you're on OSX go to launchpad in the doc -> Other/Utilities -> Terminal. If you're on linux i'll assume you can either do it already or can google it :p
If the command prompt has changed from a dollar symbol to these: >>> then congratulations! Skip the next bit and go straight to the Installing Pyglet section below (type exit() and hit enter to get rid of the >>> symbols and go back to the normal $ prompt). If instead you got 'python is not a recognised command' then follow the instructions below. (it just means that whilst you have python installed your computer doesn't know where to run it from - we can fix that!)
Windows
Open an new windows explorer window, navigate to your desktop, right click on 'My Computer', choose 'properties', then Advanced System Settings on the left hand side. The click the Environmental Variables button, and from the bottom list scroll down until you find a line called 'Path'. Select it and click 'edit'. Then add "; C:\Python34\Scripts; C:\Python34" without the quotation marks and including the starting semicolon, to the end of the text that's already. Hit save, re-start your command prompt and you're good to go! Alternatively, you can just replace 'pip' in the commands below with:
C:\Python34\Scripts\pip
UPDATE: If you're using python2.7 the the commands above should use Python27 instead of Python34
Other OSs
Google how to change your Path variable. Then add /usr/local/bin/pip and /usr/local/bin to it. Alternatively, you can just replace 'pip' in the commands below with: /usr/local/bin/pip
Installing Pyglet
So now that we have pip installed we can now install a bunch of useful libraries by opening a command prompt and typing: pip install <package_name> i.e. pip install numpy
We're going to install pyglet for Python 3 by using the command:
pip install --upgrade http://pyglet.googlecode.com/archive/tip.zip
The reason the command is so long is that we're using a 'development' bit of code (i.e. code that hasn't been exhaustively tested yet). If we were in Python2.7 then we could just type pip install pyglet but sadly that won't work here! Now wait a little while while the library downloads and installs for you and then you will be all good to go.
Final note while the package installs
Think about what you've just done. If you successfully updated your path variable you have just taught your computer how to find and run a particular program from the command prompt. That will work the same for any executable program from your computer - you can run them all from the command line by either changing your Path variable or using the full program location. This turns out to be super useful if/when you end up using the command line a lot. And I say that knowing this is most people's reaction to using the command line:

References
Monday, 26 May 2014
MIT app inventor - Bluetooth communication
In
this exercise we create a simple app to send commands via bluetooth
from an android smartphone. Ostensibly this will create a wireless
control app for robots or wearable electronics, but it’s intended to
provide a MINIMUM WORKING EXAMPLE (MWE) for bluetooth communications
using MIT App Inventor 2
Background
Before
we leap in, a few things to explain. Bluetooth communication is
wireless (similar to Wifi but on a different frequency). Bluetooth
enabled devices require connection via MAC addresses (i.e. a unique
identifier for each device) before information can be transferred.
Finally when information is being transferred each device in the pair
acts as EITHER a client (requesting information) or a server (providing
the information that’s requested). Most devices can switch between modes
allowing for bidirectional information transfer - remember it’s just
assigning which device is talking and which devices is listening at
particular times. Also information via bluetooth doesn’t all come at
once, it’s sent in Bytes, so when listening you will need to include an
indicator of when messages and/or words are complete.
Getting started
Go to MIT app inventor and register and login: http://ai2.appinventor.mit.edu
Start a new project.
Design
How do you want your App to look? What buttons/functionality does it need?
Here’s a list of what you might need for an MWE:
- connect buttons that allows device selection
- data entry - text field or by more buttons
- disconnect button
- quit button
- labels that state whether devices are connected or not
Add as much more complexity as you want (but perhaps get these bits working first)!
The ‘designer’ screen
This
screen (where you start), allows you to pick the elements (like
buttons) that you want your app to display. We decide what each one does
later. So from the left hand bar click and drag 3 buttons into your app
(if you want to play with layout check the layout tab) - and call them:
btnDisconnect, btnExit, btnSend. Finally also drag over a ListPicker
element and call it lipConnect. Change the text of these buttons (under
properties on the right hand side of the screen) to ‘Disconnect’,
‘Exit’,’Send’ and ‘Connect’ respectively. Now drag across a label
element and rename it ‘lblResult’. Finally include a clock element, and a
Bluetooth Client and server elements (found under the Connectivity
tab).
The backend
Now the fun begins - we start writing some code for each button!
In
the top right of the screen is a button that says ‘blocks’ - select it
and you should be taken to a blank canvas. this is where we will create
our masterpiece (or piece of rubbish depending on your degree of
confidence and patience!).
Exit
We’re going to start with the exit button - why? Because it’s simple.
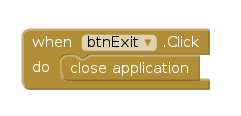
On the left click the btnExit element and you will see some options pick the one that says:
when btnExit.click
do
and
click and drag it to your canvas. All of those options were different
things interacting with the button allow you to do (like a long or short
press etc). Now from the control menu on the left select an element
called ‘close application’
and drag and drop it into the matching btn.click element you found
before. DONE. Now we have made a button that exits our program. Not too
tricky was it? Just remember what we did - we picked from the option of a
particular button and then found something that let us choose what to
do with it. It will be the same for all the other buttons too!
Connect
Our
connect button is more complicated because selecting it asks you to
choose from a list. A list of what?! A list of bluetooth devices that
your phone can find.
From the lipConnect element select:
when lipConnect.BeforePicking
do
and fill it with (from the green login menu)
set lipConnect.Elements to BluetoothClient1.AddressesAndNames

This populates our list with all the devices our bluetooth module can find in the local area
Now in a separate block of code select
when lipConnect.AfterPicking
do
and fill it with (from control):
if
then
Under if put (from the purple procedure menu)
call BluetoothClient1.connect
address -> lipConnect.Selection
Under then put
set lblResult to Connected

Disconnect
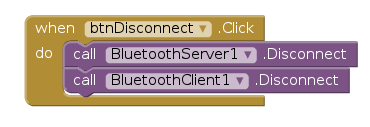
when btnDisconnect.click
do
BluetoothServer1.Disconnect
BluetoothClient1.Disconnect
Clock
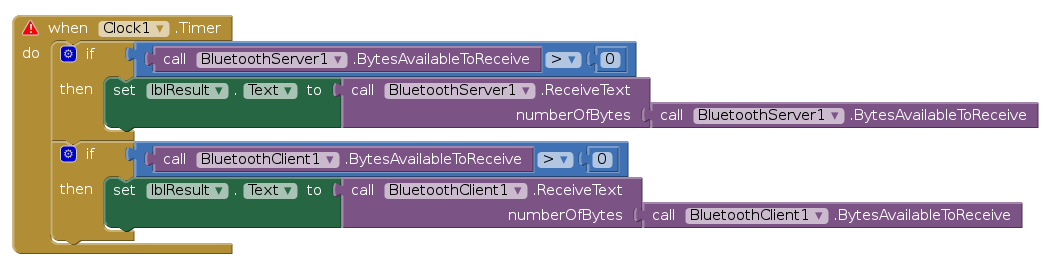
Now we want to check is and when new messages are being sent. From the Clock element select:
when Clock1.timer
do
if LIST [call BluetoothServe1.BytesAbleToRecieve > 0]
then set lblResult to call BluetoothServer1.ReceiveText
numberofbytes -> BluetoothServer1.BytesAbleToRecieve
if LIST [call BluetoothClient1.BytesAbleToRecieve > 0]
then set lblResult to call BluetoothClient1.ReceiveText
numberofbytes -> BluetoothClient1.BytesAbleToRecieve
Send
when btnSend click
do
call BluetoothServer1.SendText -> ‘1\n’
call BluetoothClient1.SendText -> ‘0\n’
The \n in the above signals the end of a line to serial communications.

The
program above is now functional (just barely - it will break at the
slightest provocation). Go try it! A much MUCH better version can be
found here: http://ai2.appinventor.mit.edu/#6612352820576256
Complete with error handling and a lot more stuff than what we covered today
Initialize
#this isn’t explicitly necessary
Print
a
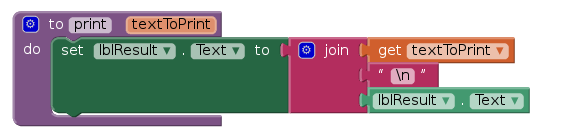
really really useful way to clean this all up is to use methods or
functions - little bits of code you use again and again. Here’s and
example of a print function that we could (and should have) used in the
example above. From Procedures
__ to print texttoPrint
do
set lblResult.Text to -> join -> get TexttoPrint
-> ‘\n’
-> lblResult.Text
Extension:
Error Handling
Remember’s previously connected devices and automatically connects
References:
http://puravidaapps.com/btchat.php
New Wellington technology groups
After a manic few months in my new position at VUW, I've finaly got a few minutes to detail exactly what I've been up to and where I hope it's going to go in the future. this blog will serve to keep track of what I've been doing, as well as to act as a summary point for all the tutorials that I have written/will write.
For those that don't know me, my aim to to encourage students to pursue careers and studies in engineering science and mathematics. Half of my time for my current position at Victoria is spent visiting schools (I tend to focus my attention on high schools but I also do visit intermediate and primary schools as well) to this end, and the other half of my time is spent providing pastoral support for the Victoria University first year Engineering students specializing in physics, mathematics and general digital engineering.
Currently, in addition to my regular school visits, I run two local technology groups for high school students that meet weekly. <tek ctrl/> at the Lower Hutt Memorial library on Thursday afternoons from 3:30pm till about 5pm and DFSLIA (a girls-only technology group) that meets at the National Library in Thorndon from 3pm-5pm on Wednesday afternoons (with the assistance of the wonderful Kate Henderson). The purpose of these is for me to spend as much time as possible with interested students (I simply don't have enough time to visit all of the 40-odd high schools in the Wellington region regularly enough!) to work on interesting projects and encourage them to learn more and experiment with modern technologies. Attendance is free and while the groups are aimed at Year 11-13 students (i.e. 16-18 year olds) interested younger students are also welcome to attend.
If you would like me to come and visit your school, don hesitate to get in touch with me via my Victoria University staff page (yes I can occasionally travel outside the Wellington region). If you're a teacher interested in Python professional development I also run small group (<4) Python PD sessions for NCEA DT levels 1,2, and 3.
I'm also trying to grow a high-school technology community base alongside the TechXperts from Wellington East Girls College, the first meeting of which will be held at Victoria University on Saturday the 14th June 2014 in AMLT102 from 11am-3pm.
What specific technology do we look at? For starters take a look at the tutorials page of this blog, but in general I'm happy to work with anything related to science, technology or mathematics. I tend to focus on python, android, blender, arduino and linux projects simply because students and schools are budget constrained and so free/cheap technologies mean more people can access them. I also work (a little) with VEX and Lego Mindstorm kits.
For those that don't know me, my aim to to encourage students to pursue careers and studies in engineering science and mathematics. Half of my time for my current position at Victoria is spent visiting schools (I tend to focus my attention on high schools but I also do visit intermediate and primary schools as well) to this end, and the other half of my time is spent providing pastoral support for the Victoria University first year Engineering students specializing in physics, mathematics and general digital engineering.
Currently, in addition to my regular school visits, I run two local technology groups for high school students that meet weekly. <tek ctrl/> at the Lower Hutt Memorial library on Thursday afternoons from 3:30pm till about 5pm and DFSLIA (a girls-only technology group) that meets at the National Library in Thorndon from 3pm-5pm on Wednesday afternoons (with the assistance of the wonderful Kate Henderson). The purpose of these is for me to spend as much time as possible with interested students (I simply don't have enough time to visit all of the 40-odd high schools in the Wellington region regularly enough!) to work on interesting projects and encourage them to learn more and experiment with modern technologies. Attendance is free and while the groups are aimed at Year 11-13 students (i.e. 16-18 year olds) interested younger students are also welcome to attend.
If you would like me to come and visit your school, don hesitate to get in touch with me via my Victoria University staff page (yes I can occasionally travel outside the Wellington region). If you're a teacher interested in Python professional development I also run small group (<4) Python PD sessions for NCEA DT levels 1,2, and 3.
I'm also trying to grow a high-school technology community base alongside the TechXperts from Wellington East Girls College, the first meeting of which will be held at Victoria University on Saturday the 14th June 2014 in AMLT102 from 11am-3pm.
What specific technology do we look at? For starters take a look at the tutorials page of this blog, but in general I'm happy to work with anything related to science, technology or mathematics. I tend to focus on python, android, blender, arduino and linux projects simply because students and schools are budget constrained and so free/cheap technologies mean more people can access them. I also work (a little) with VEX and Lego Mindstorm kits.
Subscribe to:
Posts (Atom)