In
this exercise we create a simple app to send commands via bluetooth
from an android smartphone. Ostensibly this will create a wireless
control app for robots or wearable electronics, but it’s intended to
provide a MINIMUM WORKING EXAMPLE (MWE) for bluetooth communications
using MIT App Inventor 2
Background
Before
we leap in, a few things to explain. Bluetooth communication is
wireless (similar to Wifi but on a different frequency). Bluetooth
enabled devices require connection via MAC addresses (i.e. a unique
identifier for each device) before information can be transferred.
Finally when information is being transferred each device in the pair
acts as EITHER a client (requesting information) or a server (providing
the information that’s requested). Most devices can switch between modes
allowing for bidirectional information transfer - remember it’s just
assigning which device is talking and which devices is listening at
particular times. Also information via bluetooth doesn’t all come at
once, it’s sent in Bytes, so when listening you will need to include an
indicator of when messages and/or words are complete.
Getting started
Go to MIT app inventor and register and login: http://ai2.appinventor.mit.edu
Start a new project.
Design
How do you want your App to look? What buttons/functionality does it need?
Here’s a list of what you might need for an MWE:
- connect buttons that allows device selection
- data entry - text field or by more buttons
- disconnect button
- quit button
- labels that state whether devices are connected or not
Add as much more complexity as you want (but perhaps get these bits working first)!
The ‘designer’ screen
This
screen (where you start), allows you to pick the elements (like
buttons) that you want your app to display. We decide what each one does
later. So from the left hand bar click and drag 3 buttons into your app
(if you want to play with layout check the layout tab) - and call them:
btnDisconnect, btnExit, btnSend. Finally also drag over a ListPicker
element and call it lipConnect. Change the text of these buttons (under
properties on the right hand side of the screen) to ‘Disconnect’,
‘Exit’,’Send’ and ‘Connect’ respectively. Now drag across a label
element and rename it ‘lblResult’. Finally include a clock element, and a
Bluetooth Client and server elements (found under the Connectivity
tab).
The backend
Now the fun begins - we start writing some code for each button!
In
the top right of the screen is a button that says ‘blocks’ - select it
and you should be taken to a blank canvas. this is where we will create
our masterpiece (or piece of rubbish depending on your degree of
confidence and patience!).
Exit
We’re going to start with the exit button - why? Because it’s simple.
On the left click the btnExit element and you will see some options pick the one that says:
when btnExit.click
do
and
click and drag it to your canvas. All of those options were different
things interacting with the button allow you to do (like a long or short
press etc). Now from the control menu on the left select an element
called ‘close application’
and drag and drop it into the matching btn.click element you found
before. DONE. Now we have made a button that exits our program. Not too
tricky was it? Just remember what we did - we picked from the option of a
particular button and then found something that let us choose what to
do with it. It will be the same for all the other buttons too!

Connect
Our
connect button is more complicated because selecting it asks you to
choose from a list. A list of what?! A list of bluetooth devices that
your phone can find.
From the lipConnect element select:
when lipConnect.BeforePicking
do
and fill it with (from the green login menu)
set lipConnect.Elements to BluetoothClient1.AddressesAndNames

This populates our list with all the devices our bluetooth module can find in the local area
Now in a separate block of code select
when lipConnect.AfterPicking
do
and fill it with (from control):
if
then
Under if put (from the purple procedure menu)
call BluetoothClient1.connect
address -> lipConnect.Selection
Under then put
set lblResult to Connected

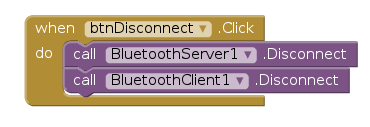
Disconnect
when btnDisconnect.click
do
BluetoothServer1.Disconnect
BluetoothClient1.Disconnect
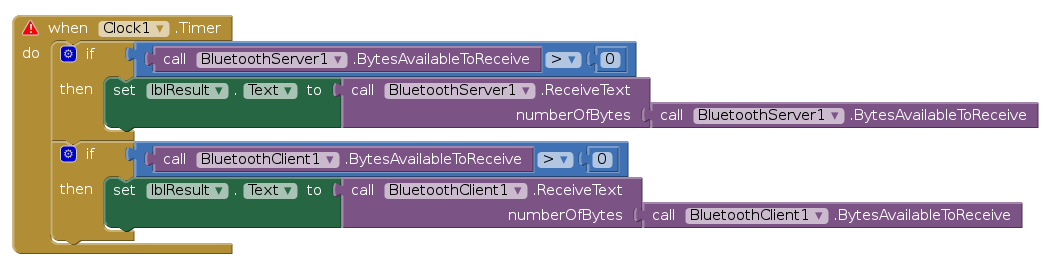
Clock
Now we want to check is and when new messages are being sent. From the Clock element select:
when Clock1.timer
do
if LIST [call BluetoothServe1.BytesAbleToRecieve > 0]
then set lblResult to call BluetoothServer1.ReceiveText
numberofbytes -> BluetoothServer1.BytesAbleToRecieve
if LIST [call BluetoothClient1.BytesAbleToRecieve > 0]
then set lblResult to call BluetoothClient1.ReceiveText
numberofbytes -> BluetoothClient1.BytesAbleToRecieve
Send
when btnSend click
do
call BluetoothServer1.SendText -> ‘1\n’
call BluetoothClient1.SendText -> ‘0\n’
The \n in the above signals the end of a line to serial communications.

The
program above is now functional (just barely - it will break at the
slightest provocation). Go try it! A much MUCH better version can be
found here: http://ai2.appinventor.mit.edu/#6612352820576256
Complete with error handling and a lot more stuff than what we covered today
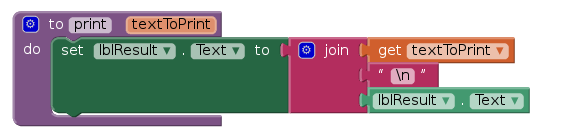
Initialize
#this isn’t explicitly necessary
Print
a
really really useful way to clean this all up is to use methods or
functions - little bits of code you use again and again. Here’s and
example of a print function that we could (and should have) used in the
example above. From Procedures
__ to print texttoPrint
do
set lblResult.Text to -> join -> get TexttoPrint
-> ‘\n’
-> lblResult.Text
Extension:
Error Handling
Remember’s previously connected devices and automatically connects
References:
http://puravidaapps.com/btchat.php
No comments:
Post a Comment